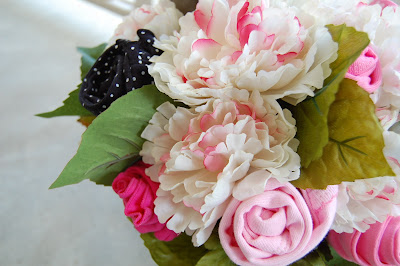
This past Saturday, our sweet friends Ashley and Jason welcomed their first baby into the world. We are so excited for all three of them and know that they'll be awesome parents to little Ellery Kate. (Her name is pretty great, right?? I think it's lovely.) Most likely, this little one will grow up to have a quick sense of humor, along with a love for others, especially those in need. She'll be smart and crafty and organized and a good worker. She'll probably make a mean cupcake. And of course, she'll be stinkin' cute, because Ashley and Jason are such a handsome couple. =) Right away, she'll be very well dressed. The outpouring of love in the form of an incredible number of gifts and guests at their church baby shower was a great indicator of how much people think of Ashley and Jason. We are fortunate to count them as close friends.
I was honored to help hostess this baby shower in September and I offered to do the decorations. So, thanks to Pinterest for this sweet idea...a fun baby shower gift that's, at once, decorative - and ultimately, pretty useful also. I've now made two of these - one for Ellery Kate and the other for another "first baby" for our good friends Sasha and Jared. (Her name will be Adelae Grace; my friends are picking some superb names lately!) Both projects were incredibly fun and fairly quick. Bonus! (Speaking of Pinterest, I hope to have a Pinterest button on the blog soon...it's in the middle of a autumn redesign, which I'm pretty excited about. Woo hoo!)
A funny story involving this project...I got a thank you note from Ashley after the shower and I handed it to Jeremy to read. At one point he paused and said, "She's using words I don't even know! O-niece? O-nee-see?" I couldn't *imagine* what he was talking about, but after a quick peek at the note, I started laughing hysterically. I guess Jeremy had never seen the word "onesie" written out...
I shared that story on Facebook a few weeks ago and my friend Lindley said her husband had sounded it out the same way...and then said, "I guess I'm looking at the Spanish side of the package..." Oh, the laughter!!
Onesie Bouquet Tutorial
Materials needed:
*medium-sized flower pot...any color and design you wish!
*styrofoam block
*knife or box cutter (for cutting styrofoam)
*hot glue gun (I highly recommend a low-temp one)
*heavy floral wire covered with floral tape (needs to be sturdy; these will be the stems)
*wire cutters
*assortment of baby onesies/matching pants, baby washcloths, and/or baby socks (all in the same color scheme). I used three sets of onesies/pants, three onesies or pants in each set.
*one bunch of "permanent flowers" with plenty of leaves attached
*floral tape, preferably green
Instructions:
1. Heat up glue gun; cut styrofoam into two smaller blocks that will fit (one on top of the other) into the pot. Glue pieces together, mainly on the edges. You don't want to make it it impossible for the floral wire to pierce through a thick smear of hardened glue. Attach the styrofoam pieces into the pot, pressing down well until adhesive is dry and blocks seem sturdy.
2. Cut floral wire to desired length. I think mine were about 9-10 inches long. Make a small loop at one end; this will help anchor the onesie rosette and also help keep it from snagging the fabric. (Good idea, Jeremy.)
3. Lay first onesie upside down and fold both sides over, much like tucking the sleeves back when folding a shirt. Place first piece of floral wire (loop side up) on the tush-side of the onesie and start rolling it up, fairly tightly. When you've finished rolling it, secure with a generous strand of floral tape. (If you've never used floral tape before, it works best when pulled and wrapped at the same time - it only becomes sticky when it stretches and then sticks to itself.)
4. Insert onesie rosette into the styrofoam. Continue making the rosettes and arranging them in a pleasing color pattern into the pot. Take care to not pierce any fabric with the floral stems.
5. After the onesie rosettes are completed and placed, cut several of the "permanent" flowers and insert them into the arrangement for visual interest. You will want to cut off the leaves from the stems and tuck them around the edge of the pot to cover any of the floral tape. Tuck a few leaves into the middle of the arrangement, too, if you have enough. I did not anchor these with glue or anything because it's a temporary arrangement. I had no problem transporting it with everything staying in place. =)
6. Admire your handiwork and take some pictures you "secretly" hope will end up on Pinterest. ;)
Coming up soon...more baby shower projects!


Kristen this is just too cute. I love it!! A darling presentation for the baby shower!
ReplyDeleteOh I have a Designer Pillows Giveaway! I hope you will join! ( a great resource as well)
xoxo
Karena
Art by Karena
What a great idea! So creative :)
ReplyDeleteThese are so absolutely adorable! I'm definitely going to have to remember this idea for the next time I go to a baby shower. And just letting you know, I'm stopping by from Kelly's Korner
ReplyDelete