Showing posts with label Dessert. Show all posts

Wednesday, February 16, 2011

Heart Day: Chocolate Covered Strawberries


First of all, let me ask...why are chocolate covered strawberries only a Valentine's thing? They are so pretty and so fun and so delicious that I think I shall start making them year round. Or at least the whole month of February, while they are still on my mind. And again in the summer, when strawberries are truly in season. Oh, yeah.


Yes, you can pay someone to make them, which I have done before (and they WERE awesome) but they're expensive. Sigh! So sometimes I say to myself, "Self, you can make this. And self, you can save some money." And that's what happens. (Side note: my husband loves when I make these kind of comments to myself.)


This year I found some Baker's Dipping Chocolate in little microwaveable containers. Brilliant! I bought both semi-sweet and milk chocolate containers and it was beyond easy. Just follow the directions on the container. Then, since I have a little stash of sprinkles, I prettied them up even more than mere chocolate can do. (Though mere chocolate is enough. For the rest of the year.)


Refrigerate for a few minutes. Serve. In the words of Ina Garten, "How easy is that?"

Up next...Part II: Flowers, Part III: Dinner, and Part IV: Gifts

P.S. One more picture...this is what happens when non-professionals try their hand at the drizzling thing...


Hope your Valentine's Day was very happy!

Friday, January 14, 2011

Vanilla Bean Pudding


Generally, I'm not much for puddings. I mean, I have some recipes for trifles and whatnots that call for instant pudding - and I oblige...it's just so quick and easy! But in my eyes, pudding is never the star of the dessert. The brownies or strawberries or sweetened whipped cream factor is always the star. Pudding is creamy and it's nice that it's there, but in 97% of situations, if there were a bowl of vanilla pudding sitting in the fridge, I could resist it, no problem. (The other 3% would involve NO chocolate OF ANY KIND being available in the house. And you will notice that 3% is a very, very tiny percentage. Our house always has chocolate.)

That's why the recipe I'm about to share with you is a game-changer. I am sitting here at the computer, composing this post, la la la - but I'd really much rather standing at our refrigerator door, sneaking a few spoonfuls of Smitten Kitchen's vanilla bean pudding. Oh, dear, yes.

I've made only a few custards in my day, but each time I have to psych myself up to do it. There's no telling what could go wrong - there's been limited success - and sometimes I've had to remake them. Which stinks. I just don't feel competent in that area. I know, I know...practice makes perfect. Well, all I know is that I'll be saving this vanilla bean pudding recipe and substituting it in every other situation that calls for pudding or custard or such. Banana pudding? Yes. Peanut Butter Pie (that they don't make any more...sad!) from The Olde Pink House in Savannah? Definitely. And can you freeze your own pudding cups? Because, man! That is seeming like an excellent idea!

If you get right down to it, though...this pudding needs nothing else. It can stand alone, exactly as is. I felt true bliss while we ate some last night. Still warm because we couldn't wait until ten o'clock at night at eat dessert. It was very delicious already - and Jeremy actually heated his back up in the microwave when its temperature dropped. (He was eating it and studying for a presentation for work at the same time). "It got cold!" he said.

All of this is truly amazing to me. Because you know how I feel about pudding. Yes, yes, I know it's because there's such a difference between instant and the real stuff, but it's still amazing.


So, I need to tell you that Smitten Kitchen is the cat's meow. The proof is in the pudding. (How do you spell that drum/cymbal crash after a bad joke?) Anyway, Deb is the Big Time, cooking from her tiny kitchen in NYC, and is now working on a Smitten Kitchen Cookbook. (Yea!) I'm terribly excited about that because I adore her writing and I think she's super smart in the kitchen. As evidenced by several testings/tastings of her recipes that I myself have held in my own kitchen. If you meander on over to her site, be sure to also click on any links embedded in her text - she's got the cutest little curly-headed toddler that shows up at least once in every post. =)

Back to foodstuffs...if you're trying to decide whether you can master the following recipe or not, remember that a pudding novice had great success with it, so I feel sure that you, too, can make this happen in your kitchen. I do have a few notes, though...

First of all, you may already have guessed this by reading the very name of the recipe, but it does call for a vanilla bean, which is exactly what inspired me to make it - because I already had some. BUT. If you don't, you may still use vanilla extract, but please use the good stuff. (A side, side note: vanilla is quite expensive in all of its variations, but do you know why? I did a little research while I was purchasing them awhile back and was very interested to see how fussy a vanilla bean vine is to grow and harvest. One has to hand-pollinate each flower! If I were growing them, I'd be charging quite a bit, too. Fortunately, a little goes a long way. That being said, I did use one whole vanilla bean instead of the half that Deb called for. Don't skimp - it's scrumptious!)

Also. Milk. Deb's recipe calls for whole milk, which I don't ever have. What I do have on a regular basis is a fridge door full of skim milk (for drinking) and half & half (for coffee/tea) - and often, heavy cream (for making scones/desserts), which was the case last night, as I had recently made scones. I used a mixture of all of these, to good effect. I would not have attempted this with only skim milk. Word to the wise.

Now, let's get started. While it's good to have your ingredients and measuring apparatuses lined up before beginning any recipe, I encourage a somewhat heightened kind of preparation in this recipe - along with studying it for just a few minutes before putting the milk on to start heating. Don't freak out...it's really not difficult, but for pudding novices, it's just going to be easier (and more fun) to be ready than to not-be-ready.


Vanilla Bean Pudding
Serves six, one-half cup portions

2 2/3 c. whole milk, divided
1/2 c. granulated sugar
1/4 c. cornstarch (yes, cup)
1/4 tsp. salt
Seeds (caviar as it's called) from one vanilla bean - or two teaspoons vanilla extract
1 large egg
1 Tbsp. unsalted butter (optional)

Begin heating 2 cups of the milk in a medium saucepan over medium low heat, stirring frequently. Combine sugar, cornstarch, salt, and vanilla bean seeds in a separate heat-safe bowl. (Hint: I used my KitchenAid with the whisk attachment for this step.) Toss the empty vanilla bean pod in the saucepan to steep as the milk continues to heat. 

Slowly add the remaining 2/3 cup of milk to the sugar mixture, whisking well during the process. Also add the egg and whisk again to combine.

Bump up the heat a tad and stir until the milk in the saucepan just begins to boil. Retrieve and discard the vanilla bean pod. Slowly pour just a tad of the hot milk into the sugar/cornstarch mixture, whisking constantly. (Important: this will temper the egg so that you won't end up with scrambled eggs. It can happen.) Slowly add the rest of the heated milk and continue whisking until things are thoroughly combined.

Pour entire mixture back into saucepan, making sure all of the sugar and vanilla bean seeds go with it (some may tend to hang out on the bottom of the mixing bowl) and heat again on medium low. Stir constantly with a silicone spatula with a wide, flat edge (my choice) or a wooden spoon. As it heats, you will notice that the spatula or spoon will start gathering thickened pudding from the bottom of the saucepan. Proceed to stir somewhat quickly as it cooks about one minute longer and thickens up considerably - but don't worry about any lumps that begin to appear. You can whisk those out. After doing so, stir in the tablespoon of butter if you choose to. I chose to - and it was outstanding.

Pour one-half cup of the pudding into six small ramekins. (I think I got my heart-shaped ones in the dollar aisle at Target a few years ago.) To avoid pudding skin, press plastic wrap gently onto the surface of the pudding before chilling in the refrigerator. Chill at least two hours. Or eat it warm, like we did, if you just can't wait.


Adapted from Smitten Kitchen


And, yes, after this pudding photoshoot, there was pudding for lunch. What? It's Friday.

P.S. This post is part of a "linky party" over at Sweet As Sugar Cookies. There's lots of other fun stuff to look at on this blog, so head on over!

Tuesday, December 14, 2010

Chocolate Fudge Pomegranate Cookies


When I first happened upon this recipe, I was alternately afraid of the bizarre-sounding coupling and also very intrigued. Curiosity won out, though, as I really couldn't get the recipe out of my mind. And, as luck would have it, I had recently popped a pomegranate into my grocery basket in hopes of finding just the right way to use it.

Jeremy was very, very concerned about the inclusion of pomegranate seeds (called "arils" - and I like that so much better, don't you?) INTO a COOKIE. He knew for a fact that I was about to ruin that chocolately cookie dough by adding in something so...strange. But I knew for a fact (or O.K., I very, very strongly suspected) that this would be one of those recipes that would make a believer out of him.


And it DID. Our friends Jen, Sasha, and Jared all loved them, too. The little pop of tartness every so often kept us entertained. It will make a believer out of you, too. But you've gotta get past your fear of the unknown...

First of all, don't be scared of pomegranates. Yes, they can be messy and yes, it might take a while to release the arils from their pithy prison...BUT. Here's an easy (and less messy!) way to do it. After washing the fruit, slice off the pomegranate's "crown." (I'm not going to lie - I got some satisfaction out of noting that it does, indeed, resemble a crown.) Next you realize that you might need to put an apron on and move some things out of the way that might get splashed with the ruby red spurts of juice. Gently cut the fruit into quarters and then drop them into a bowl of water. I would recommend lukewarm water so that your fingers won't get too cold during the next step. Again, gently (which is the key word here) start separating the arils from the inside casing. This will take a few minutes, but really, is quite relaxing if you're not in a hurry. This is also a good time to ponder God's creativity in designing such an interesting fruit. =)

Now it's time for the actual cookie recipe. I found it on How Sweet It Is, another favorite food blog that I completely enjoy. She absolutely cracks me up. Hilarious! And I've tried quite a few of her recipes, all ending up being filed under "Would Definitely Make Again."

Chocolate Fudge Pomegranate Cookies
Makes about 30 cookies
Print-friendly version

1 c. butter, room temperature
1 1/2 c. sugar
2 eggs
1 tsp. vanilla
2 c. all-purpose flour
1/2 c. cocoa powder
1 tsp. baking soda
1/4 tsp. salt
2 Tbsp. pomegranate juice (or pomegranate/blueberry juice, which was all I could find. Delicious, but EXPENSIVE)
1 c. milk chocolate chips
1/2 c. pomegranate arils

Cream butter, sugar, eggs, and vanilla until fluffy. Sift flour, cocoa powder, baking soda, and salt - combine dry mixture and wet mixture. Add pomegranate juice and mix once more. Fold in chocolate chips; fold in pomegranate arils last. Refrigerate dough for at least 2 hours - but the longer, the better.

When dough is ready to be baked, gently scoop dough out and onto a greased or parchment-lined cookie sheet. Some arils will burst in the process, but it all ends up O.K. =) Bake cookies at 350 degrees for 8-10 minutes. Cool a bit before eating.

These cookies are best eaten right after baking. After about a day, the pomegranate arils start to shrink and aren't juicy anymore.

Friday, April 2, 2010

Strawberry Nutella "Tiramisu"


Don't freak out...this tiramisu doesn't include any coffee! I did use the castoff ladyfingers from the tiramisu, though, and it is a layered dessert - so that's gonna be its official name, albeit in quotation marks. By the way, don't you love when people "misuse" quotation marks? It always strikes me as "so bizarre."

If the real tiramisu were Mount Everest, this dessert is just a little hill in my backyard. Maybe a mole hill. (Those creatures loooove our backyard. Yikes!)


Seriously, this was incredibly easy and fast - and mighty delicious, I must say. Of course, maybe I should backpedal a minute. I mean, I did use homemade ladyfingers...but since they were already made and I just pulled them out of a tupperware container, the process felt pretty speedy. Especially since I had spent several HOURS on the real tiramisu a couple of days before. Seriously, I love my husband.

Should you not have had the exact same experience as me, which resulted in leftover ladyfingers, I could imagine that substituting sliced pound cake or Angel food cake would also bring delight to your tastebuds. =)

Do you know what Nutella is? If not, it's that wonderful European hazelnut chocolate spread that the new commercials are trying to brainwash moms to think is actually healthy for their children. Don't be deceived! It may be made with skim milk, but I'm pretty sure there's nothing healthy about it. Unless you include it in a dessert that also includes strawberries, which I did, so there you go.

Here's the lowdown:

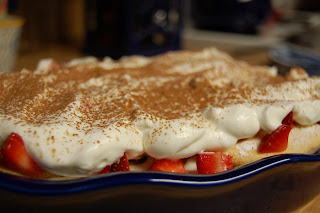
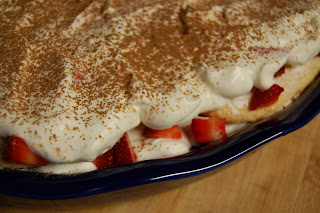
Pulled out a pretty blue ceramic dish. (Of course, yours has to be neither pretty nor blue...they are not requirements for a tasty dessert.) Layered one layer of ladyfingers in the bottom. Scattered some sliced and sweetened strawberries on top. Smeared about 1/3 to 1/2 a cup of whipped cream sweetened with a little powered sugar onto that layer. Then, Husband suggested I spread the Nutella (after he stopped and thought for a minute about whether or not Nutella and strawberries and whipped cream would go together - what? I know. It totally does. Why the hesitation?) on the bottom on the ladyfingers that would be the next layer. Good idea! It worked well. Then repeated all of the layers, ending with three layers in all. Whipped cream graced the top layer. And sifted cocoa powder (just like the real tiramisu, folks!) to make it even prettier.


Well, as I said before, it was delightful. We enjoyed it after it chilled for an hour or two, fully knowing it would be even better the next day. And, oh, it was! I don't really know how, but I had honestly forgotten there was Nutella in it when we were about to eat it the next day. And when I took a bite and the whole thing was happily melded together and the sweet hazelnut and chocolate bliss that is Nutella had hardened a bit...well, I was pleasantly shocked. I know, it sounds ridiculous.

Now, I'm going to try to give you more detailed directions for the recipe...in case someone can't really follow my vague explanation. Yes, lots of times I follow an actual recipe...but lots of other times I adapt a recipe or totally make something up, like in the case of this dessert...eyeballing the ingredient amounts, which makes it kinda hard for me to duplicate later...let alone direct someone else in how to do it. But for the purposes of this blog, I'm just gonna have to get better about that! Here's goes...

Strawberry Nutella "Tiramisu"  
Makes about 6 servings

Ingredients:
Homemade ladyfingers (or a sliced Sara Lee pound cake or Angel food cake)
About 1 to 1 1/2 cup whipping cream
1-2 Tbsp. powered sugar
Not quite a quart of strawberries, stemmed and sliced
1-2 Tbsp. granulated sugar
Several Tbsp. Nutella (maybe 6-7?) 

Directions:
Sprinkle your stemmed and sliced strawberries with 1-2 Tbsp. granulated sugar and let them juice for a few minutes. Whip the whipping cream (I can't think of a better way to say that, sorry) with 1-2 Tbsp. powered sugar (to taste) until hard peaks form. Layer ladyfingers (or sliced pound cake or Angel food cake) in the bottom of your chosen medium-sized container. (Something smaller than a 9x13) Layer strawberries and their juice over the ladyfingers, then the whipped cream. Spread Nutella on the bottoms of the next layer of the ladyfingers and repeat the layering process one or two more times, ending with whipped cream on the top. Sift a small amount of unsweetened cocoa powder onto the top layer. Cover and chill the dessert for several hours or overnight. Enjoy!

Friday, March 26, 2010

Notes on a Fancy Italian Dessert


Many years of my life were spent without knowing the awesomeness of tiramisu. Actually, many years were spent disliking the way coffee tasted, even though I loved the way it smelled. So it would follow that once I discovered that I actually could, indeed, enjoy coffee (thank you, Starbucks, for adding sugar and cream and flavorings)...I discovered the fabulousity of  tiramisu. By the way, I tend to make up words. I get it from my mom. Embrace it. It extends one's vocabulary exceedingly well!

So, tiramisu. It's delightful. And difficult to make, I'm just gonna be very honest here. But Jeremy and I love it. I have wonderful memories tied to this dessert...when Jeremy proposed to me (about two years ago exactly) he cooked a wonderful dinner of chicken spaghetti with tossed salad. And for dessert we had tiramisu that he had picked up from the Carriage House Antique Mall Cafe' in Jackson. We'd eaten it there several times and enjoyed it immensely. (By the way, I taught Jeremy how to enjoy coffee. Many, many times he had turned down his parents' offers of coffee over the years - it's their favorite beverage. But they drink it black. And we cannot. Oh, we cannot.)

Tiramisu is fancy - it's perfectly special. It reminds me of getting proposed to, which is always a nice memory. =) Jeremy's birthday was a couple of weeks ago and we had a family birthday party for him at our house a few days later. I am HUGE fan of The Pioneer Woman and had previously filed away her recipe for tiramisu in hopes of making it for a special occasion. Her recipe title is Tiramisu - You Can Do It. Yes, You Can. YES, YOU CAN. Jeremy's birthday proved to be the perfect special occasion to try it. =) Wait, "Do or do not; there is no try." I think Yoda and The Pioneer Woman would get along.

Now, since we live in small town of six thousand-something, a couple of the ingredients were a tad trying to track down. First: mascarpone cheese...a wonderful Italian cheese, sort of like our cream cheese, but not enough like it to be interchanged. (I have since looked at the Kroger in neighboring Jackson, but no mascarpone cheese there either.) I did find it at the Publix in Chattanooga. I had high hopes for also finding the ladyfinger cookies there, too, but no such luck!

So I made the ladyfingers. Well, let me rephrase that. I made some ladyfingers from allrecipes.com: Ladyfingers. I wasn't crazy about them. They were kinda fun to make - I used a gallon-sized ziplock bag with a snipped-off corner to pipe them on the parchment covered cookie sheet.


But something didn't seem right. If I made them again I would add a pinch of salt and some vanilla, I think. They were bland. And so I waffled back and forth about actually using them in my tiramisu. After all, here's how much the mascarpone cheese cost me...and I had to buy TWO of them.


In my infinite wisdom (or fear of ruining an expensive and time-consuming dessert) I decided to have another try. I absolutely loved The Pioneer Woman's Strawberry Shortcake Cake and have made the spongecake recipe itself several different times since - in regular and miniature cupcakes, not just cake. It has a fabulous flavor. And not bland at all! So I decided to try piping it in ladyfinger shapes. I was pretty proud of myself for thinking of this, I gotta say.

But here's what happened once they were cooked...


I had to laugh when I turned the oven light on. Oh, well, it's a layered dessert. Who is gonna know, right??


You see them making fun of the true ladyfingers in the background? They totally were taunting them.

Next I had to make the custardy stuff, which had to chill and then be mixed with the mascarpone cheese and sweetened whipped cream. I do not own a double boiler, so I made do with a makeshift one, as was suggested by the Pioneer Woman herself.


The recipe calls for Marsala wine, which I did not include in my version. I think I actually cooked the custard stuff too long or on too high a temp maybe. It didn't exactly look like hers, especially after it was chilled. But it all ended up alright. She warns her readers not to whip the concoction to death...that a few lumps were normal. But for mine to be incorporated into the mascarpone cheese and the whipped cream (which I kind of ruined the integrity of) I had to whip it. Oh, well, it tasted super fabulous. I made some very strong coffee to drizzle over the ladyfinger layer and added a little almond extract along with the vanilla extract - in substitution for more Marsala wine.

As I layered the dessert, I got distracted. Don't get distracted. This is what happens when you get distracted...


I forgot to drizzle coffee on the second layer and had to scrape up the creamy layer to correct my mistake. Yeesh.

I was nervous about how it would turn out...and tired. When I set the dish in the fridge that afternoon, I thought to myself, "This may be a once-in-a-lifetime recipe." I waited to see how the overall taste was - and feedback from the fam - before I decided this for sure.


The verdict? It was a winner. Everyone loooved it. Even our two-year-old friend! She wanted seconds. =)


And my mom, who doesn't like coffee. I have to say, I didn't pour too much coffee over the layers because I didn't want it to be too terribly strong. Next time, I would do a little more. That's right...I said "next time." I would make this again. Now that I have my notes and know how things should go. =) I think the first ladyfinger recipe would be satisfactory, with my additions of salt and vanilla. Just gotta find some mascarpone cheese...preferably on sale.