Showing posts with label Craftiness. Show all posts

Monday, October 17, 2011

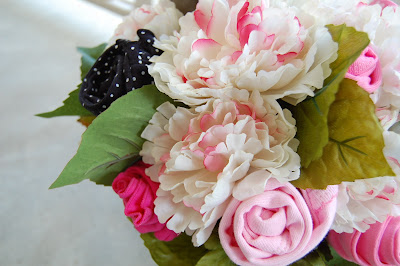
Baby Shower Onesie Bouquets


This past Saturday, our sweet friends Ashley and Jason welcomed their first baby into the world. We are so excited for all three of them and know that they'll be awesome parents to little Ellery Kate. (Her name is pretty great, right?? I think it's lovely.) Most likely, this little one will grow up to have a quick sense of humor, along with a love for others, especially those in need. She'll be smart and crafty and organized and a good worker. She'll probably make a mean cupcake. And of course, she'll be stinkin' cute, because Ashley and Jason are such a handsome couple. =) Right away, she'll be very well dressed. The outpouring of love in the form of an incredible number of gifts and guests at their church baby shower was a great indicator of how much people think of Ashley and Jason. We are fortunate to count them as close friends.


I was honored to help hostess this baby shower in September and I offered to do the decorations. So, thanks to Pinterest for this sweet idea...a fun baby shower gift that's, at once, decorative - and ultimately, pretty useful also. I've now made two of these - one for Ellery Kate and the other for another "first baby" for our good friends Sasha and Jared. (Her name will be Adelae Grace; my friends are picking some superb names lately!) Both projects were incredibly fun and fairly quick. Bonus! (Speaking of Pinterest, I hope to have a Pinterest button on the blog soon...it's in the middle of a autumn redesign, which I'm pretty excited about. Woo hoo!)

A funny story involving this project...I got a thank you note from Ashley after the shower and I handed it to Jeremy to read. At one point he paused and said, "She's using words I don't even know! O-niece? O-nee-see?" I couldn't *imagine* what he was talking about, but after a quick peek at the note, I started laughing hysterically. I guess Jeremy had never seen the word "onesie" written out...

I shared that story on Facebook a few weeks ago and my friend Lindley said her husband had sounded it out the same way...and then said, "I guess I'm looking at the Spanish side of the package..." Oh, the laughter!!


Onesie Bouquet Tutorial

Materials needed:
*medium-sized flower pot...any color and design you wish!
*styrofoam block
*knife or box cutter (for cutting styrofoam)
*hot glue gun (I highly recommend a low-temp one)
*heavy floral wire covered with floral tape (needs to be sturdy; these will be the stems)
*wire cutters
*assortment of baby onesies/matching pants, baby washcloths, and/or baby socks (all in the same color scheme). I used three sets of onesies/pants, three onesies or pants in each set.
*one bunch of "permanent flowers" with plenty of leaves attached
*floral tape, preferably green

Instructions:
1. Heat up glue gun; cut styrofoam into two smaller blocks that will fit (one on top of the other) into the pot. Glue pieces together, mainly on the edges. You don't want to make it it impossible for the floral wire to pierce through a thick smear of hardened glue. Attach the styrofoam pieces into the pot, pressing down well until adhesive is dry and blocks seem sturdy.

2. Cut floral wire to desired length. I think mine were about 9-10 inches long. Make a small loop at one end; this will help anchor the onesie rosette and also help keep it from snagging the fabric. (Good idea, Jeremy.)

3. Lay first onesie upside down and fold both sides over, much like tucking the sleeves back when folding a shirt. Place first piece of floral wire (loop side up) on the tush-side of the onesie and start rolling it up, fairly tightly. When you've finished rolling it, secure with a generous strand of floral tape. (If you've never used floral tape before, it works best when pulled and wrapped at the same time - it only becomes sticky when it stretches and then sticks to itself.)

4. Insert onesie rosette into the styrofoam. Continue making the rosettes and arranging them in a pleasing color pattern into the pot. Take care to not pierce any fabric with the floral stems.

5. After the onesie rosettes are completed and placed, cut several of the "permanent" flowers and insert them into the arrangement for visual interest. You will want to cut off the leaves from the stems and tuck them around the edge of the pot  to cover any of the floral tape. Tuck a few leaves into the middle of the arrangement, too, if you have enough. I did not anchor these with glue or anything because it's a temporary arrangement. I had no problem transporting it with everything staying in place. =)

6. Admire your handiwork and take some pictures you "secretly" hope will end up on Pinterest. ;)


Coming up soon...more baby shower projects! 


Monday, February 14, 2011

My Handy Valentine

Remember this?


The craft room. The old, disheveled "craft room" where crafts were never made because you could barely walk through it?

Well.

Now...instead...there's this!


Bless my husband for putting up wire shelves to house my abundant selection of "permanent" flowers. Luckily, this shelf also allows for hangings things from it, so now all my wreaths (some purchased, some made) have a nice home, too. My friend Jen helped me organize all of this (by color, season, holiday) even though she might have rolled her eyes a few times. ;) It also holds my selection of raffia (far left end) because I use it for everything! Wreaths, bows for presents, tying a tag on something. Get thee some raffia.


And we've found that keeping the Christmas tree up (and away) is the easiest way to start things when decorating time comes again the next year. So, there it will sit, all year...in the craft room. It makes me happy. Again, my friend Jen poked fun at me for making sure the ribbons were spaced evenly. Hey, it'd drive me crazy All Year Long if it looked wonky. (Are you starting to see why it takes me so long to do something?)


(Yes, I still have some Christmas presents I haven't given out. 
What of it?)

Next, there's this lovely window with lovely natural light pouring in. I might get a little worktable to set in front of it when I can establish that said lovely natural light will not pour straight into my eyes when I sit there. We'll see...

This is maybe the most unconventional and exciting part of the craft room remodel. Thanks to Jeremy's fantastic idea, my gift bag station resembles my favorite store...Hobby Lobby! ;)


I have a plastic tote underneath with all the bows and whistles. Handy, handy, is it not??


Here's the closet. SO MUCH BETTER. I love it. All the Christmas decorations, autumnal decorations, Easter decorations, etc. - they're all sorted and in their proper place.


And this side of the closet will hold my enormous assortment of after-Christmas-sales of shatterproof ornaments to make more of these wreaths for next year...(I laughed when I saw it, in spite of myself...what's that line from?)


And that side of the closet also holds plastic containers of stamping paraphenalia, card-making and scrapbooking stuff (though I don't technically scrapbook - but I have good intentions), painting supplies, and various crafting odds and ends. And the top shelf (not seen) holds lots of styrofoam for making flower arrangements. All pretty stinkin' easy to get to!

Several years back I bought this old red cabinet from my friend Amanda when they were moving. It holds floral design stuff - and fabric scissors (Jeremy doesn't understand the concept of fabric scissors, but I'm trying to teach him! ;) - and glue guns, plural. Because one is never enough. Or something. And now that the room is organized I can actually use the workspace on top to Make Things. Isn't that just crazy?? Sigh.


I'm very blessed that my husband knows how to build things and make things and organize things. And since we've recently discovered our love languages, I know that his "acts of service" in helping me with this big project means, in fact, that he looooves me! So when I look at my craft room and think about his help, I can always remember that. =)

Happy Valentine's Day to my sweet, handy, and extremely funny Valentine! I love you so, so much!!

Happy Heart Day to all of you, too! Thanks for coming here and reading and commenting. I enjoy our visits quite a lot. =)

P.S. There's one more thing (again, a great Jeremy idea) that will make this craft room complete. Care to venture any guesses?

Monday, January 31, 2011

A Sneak Peek

This weekend I organized my craft room, after living here for over two years. (I mean, with major help from Jeremy and my friend Jen, too.) When you inherit pack rat tendencies from BOTH of your parents, it can become a problem. So I'm still not done, but I'm soooo close. And I'm really excited about it! I'll actually be able to make flower arrangements and wreaths and whatnots IN the room itself. Instead of grabbing the materials from the (storage) room and then proceeding to make a huge mess in our kitchen. Because there was really and truly barely room to walk in the craft room before. Sigh!

Here's a sneak peek of the "Before." I cannot believe I'm showing you this. My mother would be aghast. But I'm doing it because I've been completely inspired by "before and afters" on other blogs.


Totally excited to show you the "After" soon! Once it's completed. And it must be completed soon because we're having company staying with us next week...my good college friend Matt and his newish wife Julie, who I've never even met before! I'm pretty stinkin' excited about this, too. Craft rooms and company! Doesn't get better than this. =)

Monday, December 20, 2010

Ornament Wreath Tutorial


You know all that extra time you have on your hands this time of year? That's right...the week of Christmas? Hours and hours of downtime? Because, obviously, you have all your shopping done, each present beautifully wrapped, cards sent, menus settled, groceries purchased, house cleaned. Oh, wait, that's not just me who doesn't have everything ready to go? Hmmm...

WELL. If you DO happen to have any extra time on your hands and you DO happen to find some shatterproof ornaments still in the stores (and hopefully on sale!) here's what you should do. Make a great Christmas wreath for your mantel or your door or your wall. If not, it's still totally allowable to make a wreath AFTER the Christmas holiday is over. You know, for next year and all.

This project is totally fun and would be great for a wreath-making party sometime. I had a little trouble getting started because somehow I thought I could make this work without using a hot glue gun. I know, I know...what was I thinking??! Wiring stuff together just didn't cut it. You are definitely going to want a hot glue gun unless you want to spend approximately 2 zillion (frustrating) hours making this thing. Also, you are going to want to use a LOW-TEMP glue gun on this project...unless you want third-degree burns resulting from your fun little project. I cannot stress this enough. I always use my low-temp glue gun...one time in high school I was using my mom's high temp one to make a pinata for Spanish class...there were definitely several moments where I thought about giving up craftiness altogether in favor of a less hurtful hobby. A low temp glue gun may make you say, "Well, hmmm, ouch" a few times, but it won't leave you screaming "OW! OOOOOOUUUUUUCCCCCCHHHHHHHH!" I can deal with a tiny ouch here and there, but oh, dear. Why put up with the other? I know, childbirth would not be kind to me.

The Recipe for an Ornament Wreath:

*a small or large wire wreath form (Hobby Lobby's got them)
*LOTS of shatterproof ornaments (more than you'll think you'll ever need - you can return unused ones)
*low-temp hot glue gun
*plenty of glue sticks
*scissors
*one package of tinsel, in a coordinating color (you'll use about 1/2 pkg. for a small; whole pkg. for a large)
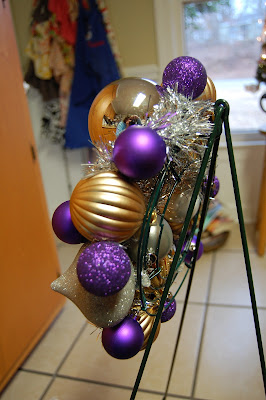
*a wreath-easel (at least that's what I call it)
*about one hour for a small-medium wreath OR 2+ hours for a large one
*an area in your house that you don't mind completely destroying with glitter and tinsel-remnants =)

Let's begin!

Spread out some newpaper on your kitchen counter - or wherever you're choosing to do this...heat up your hot glue gun...and spend a little time designing your wreath. Play a little before you start with the glue. A good assortment of various shapes and coordinating colors is awesome for creating visual interest. I used a lot a glittery ones, too. I like a lot of sparkle.

This wreath is a small one - it can be hung OR it can be used as a centerpiece for a small table. It would be pretty to encircle a candle.


I find this easier to start on a flat surface. Keep adding layers. You may to have plan out each step ahead before glueing them. It takes a little time, but you can get it fairly symmetrical. Once you start adding the second layer, you need to glue both (or three) sides of the ornaments together - whatever will be touching.
This will provide stability, which is very important.


After your ornaments are in place, hold the wreath up - preferably in the space where you will be hanging it.
Look for any holes that need to be filled in. Then, fill 'em in. Now hang it on your "wreath easel" to finish it up.


Start cutting lengths of tinsel and placing them in their desired locations. I would do about a third of the wreath and then go back and glue all of it, so I wouldn't have to cut and then lay down the scissors - then pick up the glue gun, put down the glue gun, etc.


You don't want any of the wreaths mechanics to show through. No wire wreath form should be seen at the end of this project. You also don't want to see the glue between the ornaments, so put small pieces of tinsel to cover them up.


Keep turning the wreath, so that it looks good from every angle.
Keep adding tinsel where needed.


To finish up, gently turn the wreath over onto the counter. This last step has a two-fold purpose. You are going to reinforce the first layer (which is touching the wreath form) with extra glue - and then you'll be adding the tinsel in one long piece to cover the backing. It won't completely cover the backing but it'll be good enough. It's the BACK.


Then you'll be free to admire your handiwork.
That part is pretty stinkin' fun!


Here's a second wreath. All green and red.
 It's a large one, for a front door.


But it wasn't for my front door.
I totally loved the red and green, though!


You can see some more designs on this previous post.

If you do find yourself with some spare time and you do end up making a wreath, I'd love to see it! Email me a picture at Kristen4815@gmail.com. =)

Merry Christmas Week!!


Tuesday, December 7, 2010

Pretty and Sweet


This afternoon I'll be a vendor at something called Holiday House. No, I don't usually sell things throughout the year, but I've always toyed with the idea of different projects here and there, so here's what I came up with for today's event. After much trial and error (and changing the whole way I did the first one) I finally loved how they turned out!

A mini wreath, which would be great for a small centerpiece also.


I had to fuss with the coloring on this one - this is as close
as I could get it to the true color. 
It's very, very PINK. Completely girly and so cute! 


I got the notion to make these from Melissa Lester's blog A Little Loveliness. She spoke at our Henderson Ladies' Day a year or so ago and I've followed her blog ever since. It's so beautiful, it's like reading a magazine. Gorgeous stuff! She has the cutest children and she throws the best birthday parties for them. This adorable slumber party one is my favorite, but every one of them is SO creative. I'm glad she has four children so that we don't have to wait so long for her new birthday ideas. ;) Melissa also loves tea parties, which are near and dear to my heart. I've also tried a few of her recipes and they've been sub-par. No, just kidding! Wanted to see if you were paying attention. Her recipes have been great - I make her chicken salad found in this post quite often. =)

Back to the wreaths...I have extra materials if anyone wants to order a silver wreath or a green one or another gold/brown/aqua one. I'm also planning to make a larger red and green wreath. If no one buys them, which would be kinda sad, I might secretly be happy that they might make their home right here, in my house. ;)

So, that's the "pretty" portion of the merchandise. "Sweet" will be there, too, in the forms of cranberry pecan pies (with homemade crust, mind you!) and cream scones. Maybe some other stuff if I can get it made! I had great reviews on these from last year, so I thought I'd include them again. And if people want to order a pie later, I'm going to give them an option to do so. Both the pies and the scones are great fresh, but also perfect to have on standby in the freezer during this holiday season.

Better go and get busy! Wish me luck!