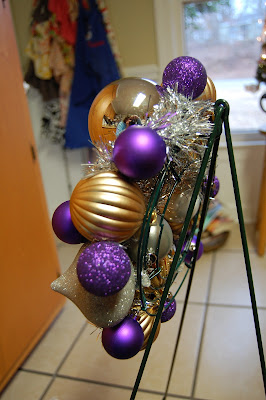
You know all that extra time you have on your hands this time of year? That's right...the week of Christmas? Hours and hours of downtime? Because, obviously, you have all your shopping done, each present beautifully wrapped, cards sent, menus settled, groceries purchased, house cleaned. Oh, wait, that's not just me who doesn't have everything ready to go? Hmmm...
WELL. If you DO happen to have any extra time on your hands and you DO happen to find some shatterproof ornaments still in the stores (and hopefully on sale!) here's what you should do. Make a great Christmas wreath for your mantel or your door or your wall. If not, it's still totally allowable to make a wreath AFTER the Christmas holiday is over. You know, for next year and all.
This project is totally fun and would be great for a wreath-making party sometime. I had a little trouble getting started because somehow I thought I could make this work without using a hot glue gun. I know, I know...what was I thinking??! Wiring stuff together just didn't cut it. You are definitely going to want a hot glue gun unless you want to spend approximately 2 zillion (frustrating) hours making this thing. Also, you are going to want to use a LOW-TEMP glue gun on this project...unless you want third-degree burns resulting from your fun little project. I cannot stress this enough. I always use my low-temp glue gun...one time in high school I was using my mom's high temp one to make a pinata for Spanish class...there were definitely several moments where I thought about giving up craftiness altogether in favor of a less hurtful hobby. A low temp glue gun may make you say, "Well, hmmm, ouch" a few times, but it won't leave you screaming "OW! OOOOOOUUUUUUCCCCCCHHHHHHHH!" I can deal with a tiny ouch here and there, but oh, dear. Why put up with the other? I know, childbirth would not be kind to me.
The Recipe for an Ornament Wreath:
*a small or large wire wreath form (Hobby Lobby's got them)
*LOTS of shatterproof ornaments (more than you'll think you'll ever need - you can return unused ones)
*low-temp hot glue gun
*plenty of glue sticks
*scissors
*one package of tinsel, in a coordinating color (you'll use about 1/2 pkg. for a small; whole pkg. for a large)
*a wreath-easel (at least that's what I call it)
*about one hour for a small-medium wreath OR 2+ hours for a large one
*an area in your house that you don't mind completely destroying with glitter and tinsel-remnants =)
Let's begin!
Spread out some newpaper on your kitchen counter - or wherever you're choosing to do this...heat up your hot glue gun...and spend a little time designing your wreath. Play a little before you start with the glue. A good assortment of various shapes and coordinating colors is awesome for creating visual interest. I used a lot a glittery ones, too. I like a lot of sparkle.
This wreath is a small one - it can be hung OR it can be used as a centerpiece for a small table. It would be pretty to encircle a candle.
I find this easier to start on a flat surface. Keep adding layers. You may to have plan out each step ahead before glueing them. It takes a little time, but you can get it fairly symmetrical. Once you start adding the second layer, you need to glue both (or three) sides of the ornaments together - whatever will be touching.
This will provide stability, which is very important.
After your ornaments are in place, hold the wreath up - preferably in the space where you will be hanging it.
Look for any holes that need to be filled in. Then, fill 'em in. Now hang it on your "wreath easel" to finish it up.
Start cutting lengths of tinsel and placing them in their desired locations. I would do about a third of the wreath and then go back and glue all of it, so I wouldn't have to cut and then lay down the scissors - then pick up the glue gun, put down the glue gun, etc.
You don't want any of the wreaths mechanics to show through. No wire wreath form should be seen at the end of this project. You also don't want to see the glue between the ornaments, so put small pieces of tinsel to cover them up.
Keep turning the wreath, so that it looks good from every angle.
Keep adding tinsel where needed.
To finish up, gently turn the wreath over onto the counter. This last step has a two-fold purpose. You are going to reinforce the first layer (which is touching the wreath form) with extra glue - and then you'll be adding the tinsel in one long piece to cover the backing. It won't completely cover the backing but it'll be good enough. It's the BACK.
Then you'll be free to admire your handiwork.
That part is pretty stinkin' fun!
Here's a second wreath. All green and red.
It's a large one, for a front door.
But it wasn't for my front door.
I totally loved the red and green, though!
You can see some more designs on this previous post.
Merry Christmas Week!!


How about if you make one for me and I buy it? =)
ReplyDeleteSome of us shouldn't be trusted alone with glue guns.
I'd love to make one for you, Shirley. =) Message with your color scheme and wreath size and I'll be on the lookout for some ornaments!
ReplyDeleteHey, hey! Me too!!! Red an silver, please. I totally want it! Not sure about the mailing it to me part... maybe we'll just have to come visit!
ReplyDeleteBtw, these look great! You're so crafty. :)
Mindy - I have some silver left - I'll try to come up with some more red. I'll be in touch. =)
ReplyDelete