Monday, February 21, 2011

Oatmeal Chocolate Chip Cookie Muffins


This morning I posted an entry on The Art of Hospitality over on the PrettySweet: Heaven-Minded blog. I am now posting this recipe to go along with it, because truly - it's a great breakfast recipe for overnight guests. Bacon, eggs, oatmeal chocolate chip cookie muffins, and maybe fruit? Coffee or tea? It's the way to go.

These muffins have a great texture from the oatmeal - and a great crunch from the sprinkle of turbinado sugar on the top. Don't leave this step out. I almost forgot until I took one more look at the recipe...and then pulled the muffins right back out of the oven and added the topping. It's a fairly healthy muffin recipe, too. Fairly. ;)

Just don't make fun of how much milk that my coffee requires...Got it?


These muffins are best right out of the oven, but they really are still good for the next few days. If you reheat them, say, in the microwave, feel free to add another little sprinkle of the turbinado sugar to pull the crunch back into play. Those sugar crystals tend to dissolve overnight...


Oatmeal Chocolate Chip Cookie Muffins
Makes twelve muffins

1 c. rolled oats (I did quick oats)
1 c. milk (I used skim + a little half & half)
1 egg
1/3 cup brown sugar
1 1/2 tsp. vanilla extract or vanilla bean paste
1/4 c. butter, melted
1 c. whole wheat pastry flour (or all-purpose flour)
1 tsp. baking soda
1/4 tsp salt
1/2 tsp. ground cinnamon
1 c. chocolate chips (I used half milk and half semi-sweet)
sprinkle of raw turbinado sugar

Preheat your oven to 350 degrees. Add the oats to a bowl and cover with 1 cup of milk. Let the oats soak for 5 or 10 minutes while you prepare the other ingredients.

Whisk the egg and the brown sugar together in a large bowl until smooth. Add vanilla and melted butter, whisking again until smooth. In another bowl, mix the dry ingredients: flour, baking soda, salt, and cinnamon. Add both dry mixture and the oat mixture to the egg mixture. Fold in the chocolate chips.

Line your muffin tin with paper liners. Evenly distribute muffin batter into the twelve cups. Sprinkle the tops of each muffin with raw turbinado sugar. Bake the muffins for 15-18 or until brown and cooked through. Serve with a pat of butter on the top, if desired.

Adapted from How Sweet It Is


Thursday, February 17, 2011

Heart Day: Flowers


I just love flowers. They can be growing in the yard or they can be a cut bouquet popping out of pretty vase on my kitchen counter. Either way, I regularly stop to admire them and take a few photos. But bouquets (especially roses and especially this time of year) can be expensive. Therefore, I am totally O.K. with my bouquets coming directly from "big, bad" Wal-Mart. They often have quite a good selection and they are affordable enough to buy here and there throughout the year. Sometimes I even purchase them for myself if there's something special that I can't seem to pass up.

Admittedly, they may not quite up to par with fresh bouquets, say, from a street vendor in Europe. When I studied in Belgium for a semester, I remember the various buckets of flowers lined up for selection. It was a point and smile order system because although I knew a teensy bit of French, I was too timid to Actually Use It. The blooms were gorgeous and the prices were just as nice. I found myself wishing for little flower markets to suddenly appear back home. Sigh!

Enter the flower station at Wal-Mart. Totally doable. And Jeremy feels the same way, so for Valentine's Day, he can get me flowers and an actual gift, if he so desires. Which is totally fine by me.

I love bouquets with unique fillers, like this purple stuff (name, anyone?) and the tall grassy stuff. And daisies always remind me of Meg Ryan's character in You've Got Mail. "Don't you think daisies are the friendliest flower?" Yes, Kathleen Kelly, I do. You're true.


I wanted to give you a few hints on how to take care of your cut bouquets, whether they come from the yard or the store. Because you want them to last as long as they can. First of all, if they came from the store, you're gonna want to recut the stems. This makes it easier on the flowers to keep drinking as much water as they want. Also, cut the stems at an angle.

I have a pair of scissors (they're plain ole scissors but they're green-handled...green = plant-friendly) that I use for only plants. If you remembered my fabric scissor comment from the post about the craft room, it's similar in theory to that. Except no, not really. Fabric scissors need to cut fabric only; if they start cutting on other things, the blades will dull and they will start raveling your fabric. Plant scissors (in my house) are reserved for plant materials. These scissors will not stay clean and that's O.K. But because they're for plants only, nothing else ever gets messed up with them. Did that make all kinds of sense or did I just basically tell you that I have too many rules? Don't answer that.

If some parts of your bouquet have woody stems (like the purple filler), you can take an extra step here. Smash the end of the stem to help it absorb even more water. Super simple.

Alright, find an appropriate vase for your bouquet. Reference this post at The Art of Doing Stuff for more info. on that. She has good ideas. As for me, I have a small stash of vases I've bought or been given. You can also recycle pretty juice bottles or Mason jars for smaller bouquets. For bigger bouquets, I tend to use this one often.


It's tall and medium sized, which holds the flowers upright and allows you to keep the stems somewhat long. It'd be perfect for a dozen roses, too. (Again, reference the above post to tell you what could happen with the wrong vase. It's kind of hilarious. =) Also, the pretty scalloped edge and designs on this particular vase dress up my entire arrangement, no matter what I put in it. Word to the wise.

I always use room temperature water to fill the vase with. The flowers are already in a bit of shock after being cut and moved around and taken in and out of water. You don't want to shock them further with freezing cold or burning hot water in their new home. Be nice to your flowers and they'll be nice to you. (Did I really just say that?) Some people suggest that you actually recut the flowers underneath running water, but I hardly ever do that. Honestly, I can't tell a difference.

If the bouquet came with a little packet of plant food, by all means, use it. Stir well to dissolve. Now you're ready to arrange!

You may want to keep the bouquet in the same exact arrangement in which it first appeared to you. If it's already pleasing to your eye, well, that's the easiest thing to do! Just grasp the bouquet, snip the stems, and insert the flowers into the vase. Done.

If you want to rearrange some things, which I often do, it doesn't take much longer. I lay a big paper towel (or three) on the counter and set the flowers on top of it. Then I first put the flowers with the largest representation in the vase. In this case, the daisies. Simply a bouquet of daisies. Then I started in with the magenta gerbera daisies, white lilies, and the pink carnations, evenly spacing them out a bit. The fillers came next and I finished up with the grassy stuff. So easy.

Another tip is to recut your stems a bit every couple of days or so. Don't cut too much, though, or you'll end up with an Incredible Shrinking Arrangement. But you won't really have to worry about that if you have tulips...I find it extremely interesting that they're the only flowers that still keep growing after they're cut. The flowers change day by day. Very, very cool.

You'll also want to change your water every couple of days or so. Sometimes I go a little longer without changing it if I don't have any more plant food available.

And that's all the flowery tips I can think of right now. I surely don't claim to be a professional florist, but I am interested in it enough to pick up some things here and there. Hope these hints are helpful to you, too!

Wednesday, February 16, 2011

Heart Day: Chocolate Covered Strawberries


First of all, let me ask...why are chocolate covered strawberries only a Valentine's thing? They are so pretty and so fun and so delicious that I think I shall start making them year round. Or at least the whole month of February, while they are still on my mind. And again in the summer, when strawberries are truly in season. Oh, yeah.


Yes, you can pay someone to make them, which I have done before (and they WERE awesome) but they're expensive. Sigh! So sometimes I say to myself, "Self, you can make this. And self, you can save some money." And that's what happens. (Side note: my husband loves when I make these kind of comments to myself.)


This year I found some Baker's Dipping Chocolate in little microwaveable containers. Brilliant! I bought both semi-sweet and milk chocolate containers and it was beyond easy. Just follow the directions on the container. Then, since I have a little stash of sprinkles, I prettied them up even more than mere chocolate can do. (Though mere chocolate is enough. For the rest of the year.)


Refrigerate for a few minutes. Serve. In the words of Ina Garten, "How easy is that?"

Up next...Part II: Flowers, Part III: Dinner, and Part IV: Gifts

P.S. One more picture...this is what happens when non-professionals try their hand at the drizzling thing...


Hope your Valentine's Day was very happy!

Monday, February 14, 2011

My Handy Valentine

Remember this?


The craft room. The old, disheveled "craft room" where crafts were never made because you could barely walk through it?

Well.

Now...instead...there's this!


Bless my husband for putting up wire shelves to house my abundant selection of "permanent" flowers. Luckily, this shelf also allows for hangings things from it, so now all my wreaths (some purchased, some made) have a nice home, too. My friend Jen helped me organize all of this (by color, season, holiday) even though she might have rolled her eyes a few times. ;) It also holds my selection of raffia (far left end) because I use it for everything! Wreaths, bows for presents, tying a tag on something. Get thee some raffia.


And we've found that keeping the Christmas tree up (and away) is the easiest way to start things when decorating time comes again the next year. So, there it will sit, all year...in the craft room. It makes me happy. Again, my friend Jen poked fun at me for making sure the ribbons were spaced evenly. Hey, it'd drive me crazy All Year Long if it looked wonky. (Are you starting to see why it takes me so long to do something?)


(Yes, I still have some Christmas presents I haven't given out. 
What of it?)

Next, there's this lovely window with lovely natural light pouring in. I might get a little worktable to set in front of it when I can establish that said lovely natural light will not pour straight into my eyes when I sit there. We'll see...

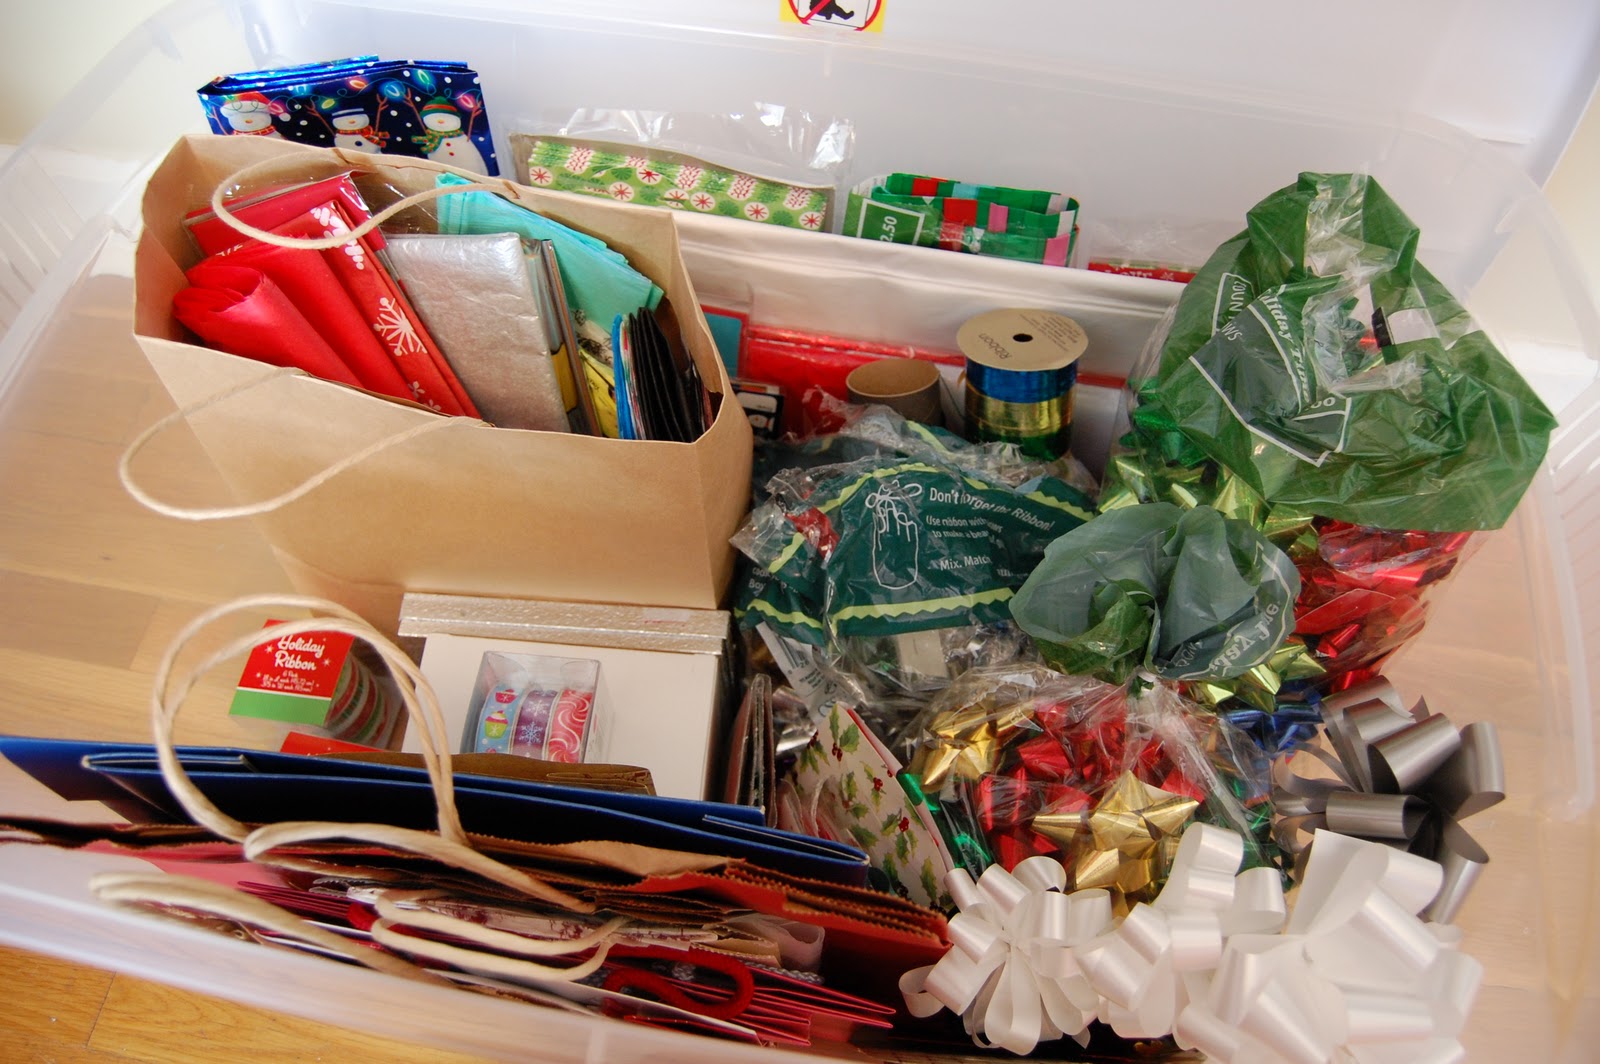
This is maybe the most unconventional and exciting part of the craft room remodel. Thanks to Jeremy's fantastic idea, my gift bag station resembles my favorite store...Hobby Lobby! ;)


I have a plastic tote underneath with all the bows and whistles. Handy, handy, is it not??


Here's the closet. SO MUCH BETTER. I love it. All the Christmas decorations, autumnal decorations, Easter decorations, etc. - they're all sorted and in their proper place.


And this side of the closet will hold my enormous assortment of after-Christmas-sales of shatterproof ornaments to make more of these wreaths for next year...(I laughed when I saw it, in spite of myself...what's that line from?)


And that side of the closet also holds plastic containers of stamping paraphenalia, card-making and scrapbooking stuff (though I don't technically scrapbook - but I have good intentions), painting supplies, and various crafting odds and ends. And the top shelf (not seen) holds lots of styrofoam for making flower arrangements. All pretty stinkin' easy to get to!

Several years back I bought this old red cabinet from my friend Amanda when they were moving. It holds floral design stuff - and fabric scissors (Jeremy doesn't understand the concept of fabric scissors, but I'm trying to teach him! ;) - and glue guns, plural. Because one is never enough. Or something. And now that the room is organized I can actually use the workspace on top to Make Things. Isn't that just crazy?? Sigh.


I'm very blessed that my husband knows how to build things and make things and organize things. And since we've recently discovered our love languages, I know that his "acts of service" in helping me with this big project means, in fact, that he looooves me! So when I look at my craft room and think about his help, I can always remember that. =)

Happy Valentine's Day to my sweet, handy, and extremely funny Valentine! I love you so, so much!!

Happy Heart Day to all of you, too! Thanks for coming here and reading and commenting. I enjoy our visits quite a lot. =)

P.S. There's one more thing (again, a great Jeremy idea) that will make this craft room complete. Care to venture any guesses?

Friday, February 11, 2011

HaliHannigan's Cupcakery


I'd been hearing rumors of this new cupcake shop in our neighboring town of Jackson for awhile now. So while I was out running errands the other day, I stopped in to HaliHannigan's to take a peek. I cannot lie...and also to conduct my own taste-test. =)


First of all, this place is CUTE. And charming. I wish I had a picture to show you. It's got a pink floor, to which I immediately said, "Yes, please." (Jeremy's agreed to paint our hardwood the same color. Happy Valentine's Day to me!! Also, April Fool's Day is soon, is it not?) The rest of the decor was super cute also, but the real draw, of course, are the cupcakes themselves, all pretty on display in two glass cases.

They offered 4 cupcakes for $10.00, which seemed reasonable for beautiful (and delicious) cupcakes. They had about 10-15 flavor offerings and the cashier told me the varieties change constantly - their Facebook page will continually spread the news of the current menu options. I could tell they had a great selection of Valentines cupcakes at this time of year, so I wanted to be sure to tell you about about this place before this weekend. In case you live around here - and in case you're not a baker or you're too busy or you're what-have-you...


I picked out the Peanut Butter Chocolate Explosion, Cherry Cheesecake, Turtle Cheesecake, and Chocolate Raspberry. We had friends in town for the FHU Bible Lectureship this week (and had such a great time with them!) so we had a cupcake-tasting party after one of the evening lectures. I had given my mom the turtle cheesecake one, but we really had plenty left to taste because our friend Matt doesn't really like sweets. (Something I will never understand.) Jeremy, Julie, and I are the normal ones - and we enjoyed every bite!

My mom's Turtle Cheesecake


Chocolate Raspberry


Cherry Cheesecake


Peanut Butter Chocolate Explosion

The consensus: The Cherry Cheesecake one was incredible! And the hands-down winner. The tastes and textures were amazing. Running a close second was the Chocolate Raspberry, which had pink edible glitter. (Pink glitter that you can eat!! Oh, yeah. Happy day.) We were so sugared up that we barely even got to the PB and chocolate one. It was good, but we were all partial to the others.

From their Facebook page, it looks like they will also have chocolate covered strawberries and some other fancy Valentine treats during the next few days. Mmmm! HaliHannigan's Cupcakery is located in The Columns, near Ashley Furniture - and whatever gym is over there. ;) You should check them out. I think they're pretty sweet. And no, they're not paying me to say so. =)

Happy Friday!
Kristen

Tuesday, February 8, 2011

Aprons and Awards


See this apron? The small one in the front? The one with the heart stenciled on it?

I made it YEARS ago, with lots of help (obviously) from my mother and grandmother, to enter in a contest for 4-H. I didn't win. It was because "it looked too perfect that an elementary school kid couldn't have possibly made it." Can you believe that?? Hahaha! Hooo boy!


Actually, I know I had a lot of help, but they didn't do it for me. They taught me how and I did it. I can't help that I did it so well! So perfect and without a stitch out of place. Anyway. I'm not still bitter about that contest. I'm not. I think it's kinda funny. Because it does look pretty perfect. ;)

I got it out to display for Valentine's Day. No, I don't have a Packers or a Steelers apron, so this one will have to do. =)

I may not have won that 4-H contest way back when, but I did get a sweet blog award (actually, two! one for this one and one for PrettySweet: Heaven-Minded) from my friend Heather at Yet To Be a few days ago. It made my day. =) Thank you, Heather! I think you're awesome and your photography is awesome and I think we ARE, indeed, kindred spirits in many ways.

To accept this award, I am supposed to do a few things: tell you seven things about myself. Also I need to tell you about some newish, stylish blogs in my own line of vision and bequeath them with the Stylish Blog award - and course, notifying them afterward. Woo hoo! I love to share! And lastly, link back to my bestower of the award, which I already did. (Note: I thought spellcheck was going to tell me that "bestower" is not a real word. But it is! It's real!)


First of all, to my friend Sarah, who tells us small-town folks about her adventures in New York City at A Georgia Peach in the Big Apple. I looove keeping up with her and hearing about her acting auditions and volunteer work and general big city life. I think it's awesome that she's pursuing her dreams. Someday we'll see you in the movies, Ms. Decker!

And to my friend Jennifer, who just started a new blog for her stationery business at Hart to Heart Stationery Designs. She has done digital scrapbooking for quite awhile and then got into making personalized party invitations and supplies for her three children. Her stuff is adorable! And she has the best party ideas. =) I think she's very reasonably priced, too. Check her out.

And now...the seven things:

1. I already told you about the heart apron that I didn't win a contest with.

2. And I already told you that I didn't have a Packers or a Steelers apron. (And that, my friends, is because sometimes I don't even watch the Super Bowl. Gasp!) But I do, pretty much, collect aprons. As you can tell. The one to the right of the heart apron was a wedding gift from my sweet friend Mindy (who is a pretty stylish blogger herself - but alas, her blog is not new.) She knows me well. =)


3. I hate to dust. And my house tells on me ALL the time. Big, heavy SIGH. But right now, it's nearly spotless...because we have company. The house looks awesome. =) At the moment I am highly motivated to keep it just so.

4. I'm not a phone person. I'd much rather email somebody and they can answer me anytime they choose to. Phone calls make me a little nervous, but they used to make me A LOT nervous. I'm much better than I used to be, but I still usually have to psych myself up for making certain calls.

5. I totally enjoy coffee, but it needs to be a light roast, like Breakfast Blend. Jeremy is the same way - the other stuff is too bitter for us. Also, CoffeeMates' Italian Sweet Creme is pretty delightful.

6. I have been designing my first book cover. Not for a book I wrote, though I would like to write one. But for my dad's small printing/publishing business. I am working part time for him and I am really enjoying it!

7. The craft room renovation is sooooo close to completion. Woo hoo! One more step! Hold on and stay tuned...

Happy Tuesday!
Kristen

Monday, January 31, 2011

A Sneak Peek

This weekend I organized my craft room, after living here for over two years. (I mean, with major help from Jeremy and my friend Jen, too.) When you inherit pack rat tendencies from BOTH of your parents, it can become a problem. So I'm still not done, but I'm soooo close. And I'm really excited about it! I'll actually be able to make flower arrangements and wreaths and whatnots IN the room itself. Instead of grabbing the materials from the (storage) room and then proceeding to make a huge mess in our kitchen. Because there was really and truly barely room to walk in the craft room before. Sigh!

Here's a sneak peek of the "Before." I cannot believe I'm showing you this. My mother would be aghast. But I'm doing it because I've been completely inspired by "before and afters" on other blogs.


Totally excited to show you the "After" soon! Once it's completed. And it must be completed soon because we're having company staying with us next week...my good college friend Matt and his newish wife Julie, who I've never even met before! I'm pretty stinkin' excited about this, too. Craft rooms and company! Doesn't get better than this. =)

Friday, January 28, 2011

A Couple of Hicks


Let me relate another husband/wife conversation for you. Also, let me set the scene. We were standing at the kitchen counter last night, sorting through mail. Jeremy opens a letter from State Farm kindly requesting that we use them for all of our insurance needs. O.K., go!

Jeremy: Oh, it's State Farm. I was thinking, "Why are you sending me this letter? We already have insurance with you." But we have that other farm one.

Kristen: I know! There are too many with "farm" in their names. It always gives me pause.

Jeremy: Gives you pause?? What?

Kristen: Not "paws." (imitate kitty paws to demonstrate) You know, like it makes me go, "Hmmm...which one is this?" Gives me pause.

Jeremy: You're a Hicks now. We don't say stuff like that. You're gonna have to cut that out.

By that time we were both laughing pretty hard. Or maybe that was just me? He can deliver funny lines pretty straight-faced, but then he eventually get tickled, too. I love that about him. =)

Tuesday, January 25, 2011

Gift Idea: BeaterBlade!


There are tons of things that make my life easier in the kitchen. And I just got a new and very lovely one for Christmas...I saw the BeaterBlade first in a magazine and left the page open (for weeks, maybe?) until Jeremy got the hint. He did well. He got me the one with the red silicone blades. It Is Awesome.

"Why?" you ask. Well, I'll tell you. You know how you have to scrape down the mixing bowl every so often while you're in the middle of mixing cookie dough or smashing potatoes? Well, this thing does it for you. And afterwards you can detach it and use it as a spatula to scrape out the bowl. Less dishes to wash! Excellent. Don't you wish you'd thought of this idea first?? I certainly do. No kidding.

I have a KitchenAid mixer and my BeaterBlade is specifically designed to fit it. The BeaterBlades are not made by KitchenAid, though, so if you have another brand of stand mixer, check their website to see your options. And if it's cheaper on Amazon, well, there you go. That's where mine came from.

Really, it's a perfect gift to give the cooks and/or bakers in your life. Valentine's Day is coming up and doesn't it kind of even look like a heart?

What? Not even a little?

Oh. Huh.

Just use your imagination, O.K.? Bakers will heart BeaterBlade. Of this you can be certain. And if you need to leave this blog post open for your significant other to discover, I'm here for you. =)

Tuesday, January 18, 2011

A Weekend Guest


Jeremy and I puppysat this adorable little one this past weekend. Her name is Lily - she's a Maltipoo and she belongs to our good friends Sasha and Jared. She loves to snuggle and sleep and play with her squeaky toys. Especially the ones that are as big as she is.


She's such a good, super smart dog. Never chews on or bothers things that don't need to be bothered. And she's great for people with allergies...you can hardly ever see evidence of shedding. It's awesome.

She's totally against PDA, though. While she was here, I was getting ready in the bathroom and Jeremy came up to give me a hug. She was trailing right behind him and we looked down at her...and in the most perfect display of comedic timing...she literally gagged. I am not even kidding.

Lily is the best. We always miss her when she's gone. =(


Friday, January 14, 2011

Vanilla Bean Pudding


Generally, I'm not much for puddings. I mean, I have some recipes for trifles and whatnots that call for instant pudding - and I oblige...it's just so quick and easy! But in my eyes, pudding is never the star of the dessert. The brownies or strawberries or sweetened whipped cream factor is always the star. Pudding is creamy and it's nice that it's there, but in 97% of situations, if there were a bowl of vanilla pudding sitting in the fridge, I could resist it, no problem. (The other 3% would involve NO chocolate OF ANY KIND being available in the house. And you will notice that 3% is a very, very tiny percentage. Our house always has chocolate.)

That's why the recipe I'm about to share with you is a game-changer. I am sitting here at the computer, composing this post, la la la - but I'd really much rather standing at our refrigerator door, sneaking a few spoonfuls of Smitten Kitchen's vanilla bean pudding. Oh, dear, yes.

I've made only a few custards in my day, but each time I have to psych myself up to do it. There's no telling what could go wrong - there's been limited success - and sometimes I've had to remake them. Which stinks. I just don't feel competent in that area. I know, I know...practice makes perfect. Well, all I know is that I'll be saving this vanilla bean pudding recipe and substituting it in every other situation that calls for pudding or custard or such. Banana pudding? Yes. Peanut Butter Pie (that they don't make any more...sad!) from The Olde Pink House in Savannah? Definitely. And can you freeze your own pudding cups? Because, man! That is seeming like an excellent idea!

If you get right down to it, though...this pudding needs nothing else. It can stand alone, exactly as is. I felt true bliss while we ate some last night. Still warm because we couldn't wait until ten o'clock at night at eat dessert. It was very delicious already - and Jeremy actually heated his back up in the microwave when its temperature dropped. (He was eating it and studying for a presentation for work at the same time). "It got cold!" he said.

All of this is truly amazing to me. Because you know how I feel about pudding. Yes, yes, I know it's because there's such a difference between instant and the real stuff, but it's still amazing.


So, I need to tell you that Smitten Kitchen is the cat's meow. The proof is in the pudding. (How do you spell that drum/cymbal crash after a bad joke?) Anyway, Deb is the Big Time, cooking from her tiny kitchen in NYC, and is now working on a Smitten Kitchen Cookbook. (Yea!) I'm terribly excited about that because I adore her writing and I think she's super smart in the kitchen. As evidenced by several testings/tastings of her recipes that I myself have held in my own kitchen. If you meander on over to her site, be sure to also click on any links embedded in her text - she's got the cutest little curly-headed toddler that shows up at least once in every post. =)

Back to foodstuffs...if you're trying to decide whether you can master the following recipe or not, remember that a pudding novice had great success with it, so I feel sure that you, too, can make this happen in your kitchen. I do have a few notes, though...

First of all, you may already have guessed this by reading the very name of the recipe, but it does call for a vanilla bean, which is exactly what inspired me to make it - because I already had some. BUT. If you don't, you may still use vanilla extract, but please use the good stuff. (A side, side note: vanilla is quite expensive in all of its variations, but do you know why? I did a little research while I was purchasing them awhile back and was very interested to see how fussy a vanilla bean vine is to grow and harvest. One has to hand-pollinate each flower! If I were growing them, I'd be charging quite a bit, too. Fortunately, a little goes a long way. That being said, I did use one whole vanilla bean instead of the half that Deb called for. Don't skimp - it's scrumptious!)

Also. Milk. Deb's recipe calls for whole milk, which I don't ever have. What I do have on a regular basis is a fridge door full of skim milk (for drinking) and half & half (for coffee/tea) - and often, heavy cream (for making scones/desserts), which was the case last night, as I had recently made scones. I used a mixture of all of these, to good effect. I would not have attempted this with only skim milk. Word to the wise.

Now, let's get started. While it's good to have your ingredients and measuring apparatuses lined up before beginning any recipe, I encourage a somewhat heightened kind of preparation in this recipe - along with studying it for just a few minutes before putting the milk on to start heating. Don't freak out...it's really not difficult, but for pudding novices, it's just going to be easier (and more fun) to be ready than to not-be-ready.


Vanilla Bean Pudding
Serves six, one-half cup portions

2 2/3 c. whole milk, divided
1/2 c. granulated sugar
1/4 c. cornstarch (yes, cup)
1/4 tsp. salt
Seeds (caviar as it's called) from one vanilla bean - or two teaspoons vanilla extract
1 large egg
1 Tbsp. unsalted butter (optional)

Begin heating 2 cups of the milk in a medium saucepan over medium low heat, stirring frequently. Combine sugar, cornstarch, salt, and vanilla bean seeds in a separate heat-safe bowl. (Hint: I used my KitchenAid with the whisk attachment for this step.) Toss the empty vanilla bean pod in the saucepan to steep as the milk continues to heat. 

Slowly add the remaining 2/3 cup of milk to the sugar mixture, whisking well during the process. Also add the egg and whisk again to combine.

Bump up the heat a tad and stir until the milk in the saucepan just begins to boil. Retrieve and discard the vanilla bean pod. Slowly pour just a tad of the hot milk into the sugar/cornstarch mixture, whisking constantly. (Important: this will temper the egg so that you won't end up with scrambled eggs. It can happen.) Slowly add the rest of the heated milk and continue whisking until things are thoroughly combined.

Pour entire mixture back into saucepan, making sure all of the sugar and vanilla bean seeds go with it (some may tend to hang out on the bottom of the mixing bowl) and heat again on medium low. Stir constantly with a silicone spatula with a wide, flat edge (my choice) or a wooden spoon. As it heats, you will notice that the spatula or spoon will start gathering thickened pudding from the bottom of the saucepan. Proceed to stir somewhat quickly as it cooks about one minute longer and thickens up considerably - but don't worry about any lumps that begin to appear. You can whisk those out. After doing so, stir in the tablespoon of butter if you choose to. I chose to - and it was outstanding.

Pour one-half cup of the pudding into six small ramekins. (I think I got my heart-shaped ones in the dollar aisle at Target a few years ago.) To avoid pudding skin, press plastic wrap gently onto the surface of the pudding before chilling in the refrigerator. Chill at least two hours. Or eat it warm, like we did, if you just can't wait.


Adapted from Smitten Kitchen


And, yes, after this pudding photoshoot, there was pudding for lunch. What? It's Friday.

P.S. This post is part of a "linky party" over at Sweet As Sugar Cookies. There's lots of other fun stuff to look at on this blog, so head on over!

Tuesday, January 11, 2011

Cincinnati Chili


One of my future projects is to organize my recipes - besides my cookbooks and online food blogs and ideas floating around in my head, there's this (pitiful) stack of recipes that Jeremy and I have. Newspaper clippings, printings from allrecipes.com, handwritten ones on scraps of paper and napkins. I do have an accordion file where my most favorite (usually handwritten) ones reside, but they're still difficult to find and I refuse to keep filing the newer ones away using such an unfortunate system. Sigh! The trials of perfectionism. Too many times it holds a finished product at arm's length. If anyone can help me, it would be much obliged.

I've never even tried quite a few of these stragglers. I remember one time that I made a completely terrible, sodium-laden beef and broccoli stir-fry using one of these random recipes - and with great relief, I just threw the recipe away afterwards. Jeremy cheered me on. The recipe had no redeeming qualities...nothing that made me say, "Almost! I'll keep tweaking."

After church this past Sunday, though, I tested out a recipe for Cincinnati Chili that was plucked from this unsightly stack of recipes. It will surely go into the special saved file, whenever I figure out my system. It was really very good - and different from any chili we've ever had, due to the combination of spices. Sure it had chili powder, but what intrigued me was the unsweetened cocoa, the allspice, the cinnamon. Right down my alley, I tell you. And chili served on top of pasta?? Unheard of! We had to check it out.


Now, I don't know all that much about Cincinnati chili in general - I'd heard the name of it before, but that's about it. And this recipe was submitted to the publication from someone who lives in Massachusetts. Figures. Unless there's a Cincinnati in Massachusetts...hmmm....

Dana, my Ohio reader, you'll have to let me know if this recipe is legit. ;)


Cincinnati Chili
Serves 4-6

1 lb. lean ground beef
3/4 c. diced red (purple) onion
1-2 garlic cloves, pressed
1-2 cans (15 oz. each) tomato sauce
1 1/2 c. water
2 tsp. unsweetened cocoa
1 1/2 tsp. chili powder
salt, to taste (depending on sodium content of tomato sauce)
1/4 tsp. ground allspice (or a little ground ginger, nutmeg, and cloves)
1/4 tsp. ground cinnamon
1/4 tsp. ground cumin
1/8 tsp. ground cayenne pepper, or to taste
1 1/2 tsp. apple cider vinegar
dry pasta, cooked according to package directions (our favorite is angel hair)
1 (15-oz.) can red kidney beans, heated
chopped onion, for garnishing
shredded cheddar cheese, for garnishing

Crumble beef into a large, non-stick skillet, cooking over medium-high heat. Brown beef and add diced onion halfway through. Mix in pressed garlic, tomato sauce (starting with one can), water, cocoa, chili powder, salt, allspice, cinnamon, cumin, cayenne pepper, and vinegar. Bring to a simmer, stirring often. Taste the balance of spices - I felt it was too tame so I added more. Then it got a tad too spicy - never fear, though! Just add more tomato sauce - I added another half can of it because it seemed the sauce was too thin also.

Simmer with skillet uncovered for about 1 hour. To serve, ladle sauce over cooked pasta. To finish it off, add kidney beans, more onion, and cheese. Or just add the kidney beans to the meat mixture. I'm not sure why it's a "topping." Either way, enjoy!

Adapted from the American Profile magazine found in our newspaper